So…
it doesn’t really matter whether you’ve been sewing all of your life or if you’ve just completely your first project, everyone wants to get the best result possible when they sit in front of that sewing machine. But here’s the thing, based on some of the phone calls and pictures I’ve received over the past few years I think it might be time to point out how important it is to constantly utilize a good foundation of basic sewing skills. Because even if you’re using the most expensive fabric in the world for your project, poor sewing habits can and will cheapen the final appearance! So… in order to give ALL your projects that polished and professional look, here’s a few basic sewing habits that are definitely worth incorporating into your routine!

1.) Use the correct materials.
—-It doesn’t make sense to ignore the clear recommendations in a materials list. For example, a few weeks ago a customer sent me a picture of the bag she had made. To tell you the truth, I wasn’t even sure if it was one of our designs. I could see where it bore a slight resemblance to our Quattro pattern, but it was so badly mis-shapen that I couldn’t even be sure. The problem? It was fairly evident that this customer had not used the proper foundation material, if any at all. Such a shame and such a waste of what looked like beautiful fabric. Especially when there were very clear recommendations on the pattern back for the materials needed to get the best results.
2.) Cut out your pattern pieces carefully and accurately.
—I’ve actually received more than a few phone calls over the years from folks wondering if they should cut outside, inside or in the middle of the pattern lines. First off, I would never recommend cutting inside the fabric lines because this basically renders the pattern unusable for a second project. I tend to cut my pieces along the outside edge of the pattern lines, but the most important thing is to be consistent in your cutting. If you’re going to cut outside the pattern lines, then do that ALL the time.
—If your pattern pieces or your fabric is wrinkled or crumpled, then take the time to press them flat PRIOR to cutting. You can’t expect to get accurate fabric cuts if either your fabric or your paper pattern pieces are wrinkled.
3.) Use the correct seam allowance.
—Seams allowances can vary greatly from project to project. Check the instructions and adhere to the seam allowance called for ALL the time and remember that the seam allowance may change for different parts of a project.
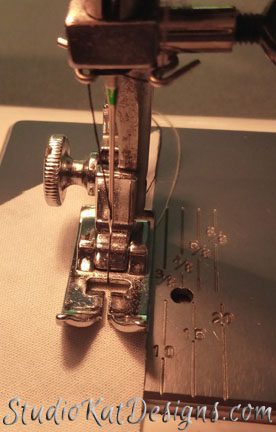
It’s always a good idea to verify that the marked seam indicators on your machine are accurate. Try testing it on a scrap piece of fabric, measure your seam with a ruler, and then mark that position on your sewing machine so that you can be sure to line it up properly every time. For example, I have one presser foot that kind of obscures the 1/4″ seam line on my machine, and I remember that I used to line my raw edge along the outer edge of my presser foot because it SEEMED right, but when I tested it by using a different presser foot that allowed me to SEE the actual machine marking, the difference was startling!
4.) Press often. Press correctly.
—There’s a fundamental difference between pressing and ironing. Ironing involves long, sweeping strokes that can actually stretch or distort your fabric especially when its been cut on the bias.
Pressing on the other hand is when you lift your iron and place it gently down over the area to be pressed (usually a seam), then lift it and move it again. It’s an up-and-down motion rather than a side-to-side motion. So remember, PRESS your fabric… do NOT iron it.
—Pay close attention to the heat setting on your iron. In general, you want to use the lowest setting that will press your fabric effectively. I also recommend testing your heat setting on a scrap piece of your fabric. (don’t ask me how I know this!)
—Avoid pressing over pins because they can create dents in your fabric, they can scratch your iron’s pressing surface AND the pin heads can melt into your fabric.
—Pay attention to your instructions and press as you go. I can’t emphasize this enough. Keep your iron and ironing board set up at all times so you won’t be tempted to proceed without pressing.
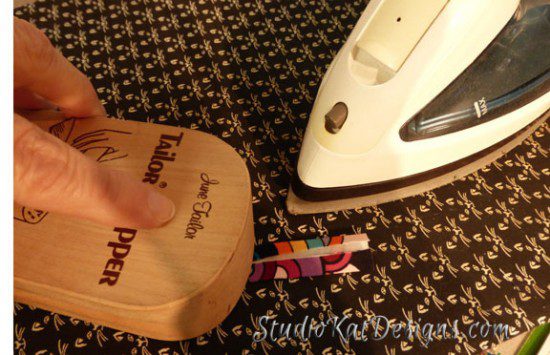
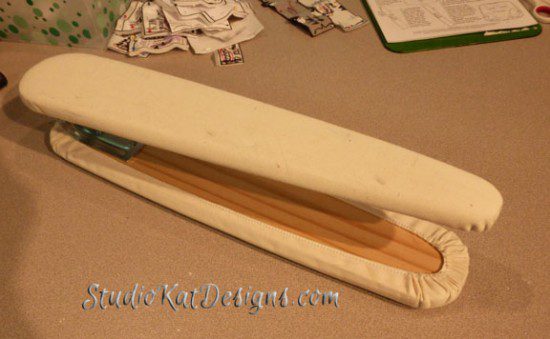
—Use the appropriate pressing tools. For a crisp pressed edge, it’s hard to beat a clapper board and a sleeve board will help you get into tight spaces.
5.) And last but most certainly not least. Do NOT rush.
—It’s just too tempting to cut corners and half-hearted skim thru the directions when you’re in a hurry, or working on a tight deadline. Did you know that mos of the “confused customer” calls I get are from those that are rushing frantically to finish a bag for a special event of some type? And most of these calls come in after 11pm (EST), and no…. I don’t answer calls after 530pm but I do listen to the message the next morning and these messages in particular are heartbreaking. So take your time… Enjoy the process… And remember the basics!
And now… it’s YOUR turn!
Do you agree with the importance of these basic sewing skills? And if you can think of any other basic skills that you feel are vital to achieving a professional finish to your projects, please feel free to leave your comments and suggestions in the space provided below.
***************************************************************
And don’t forget, we actually LOVE questions and comments too, so if you’d like to share yours, please feel free to do so the section provided below! And if you enjoyed this post, please feel free to share it via FaceBook or Twitter!
4 Comments
Join Our Mailing List!
Click button below to get 15% off your 1st pattern!


I never cut any pattern, whether it is for bags or clothing. Mine are all traced onto pattern tracing fabric. That was the pattern remains intact. Using pattern fabric makes it much easier to learn how the pieces go together. It also makes fitting clothing patterns much easier. One Vogue pattern I own from the 60’s, used, but uncut and carefully refolded, sold for $80.
I so agree! These are great ideas! 🙂
I like all your suggestions. I will have to get a clapper board. Have never used one.
I don’t blame you for not answering the phone at night. If you are on the west coast at 8pm, they don’t think about it being 11pm here.
Thank you for all the beautiful patterns and the help you give.
Clapper boards are great for getting into the nooks and crannies of small bags! 🙂