So…
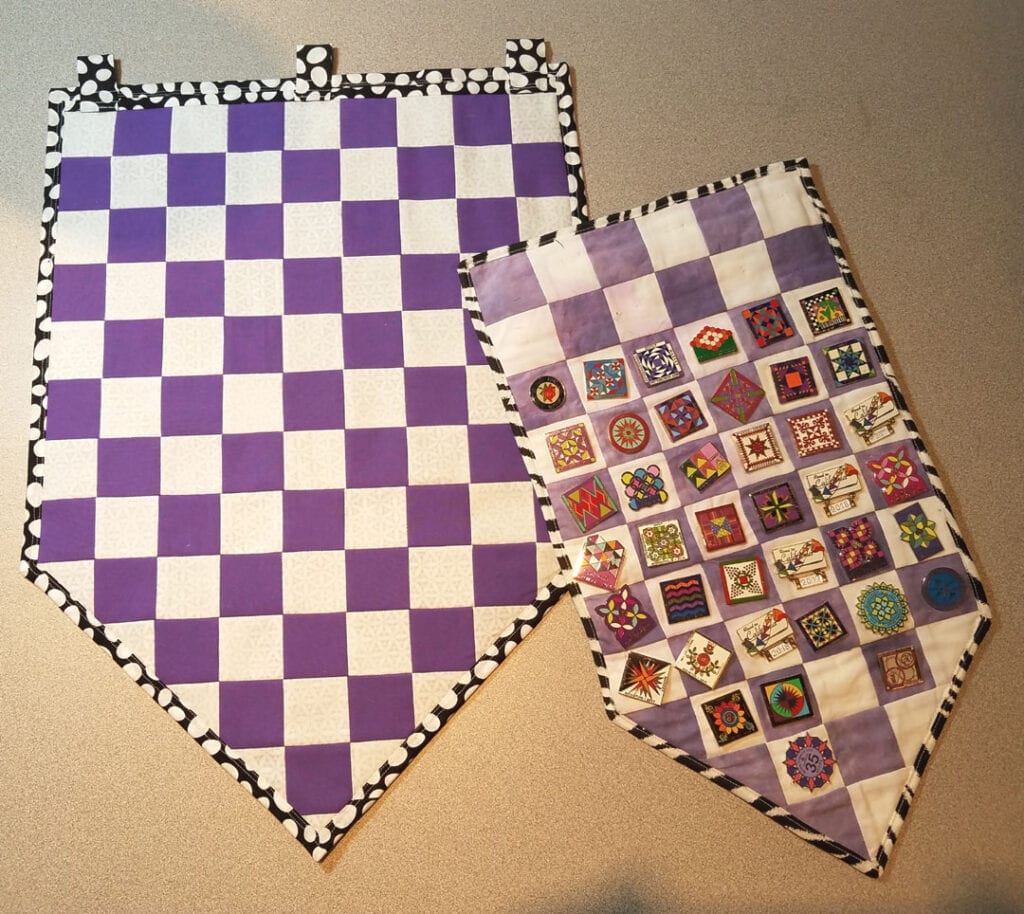
over 5 years ago I made a pin banner to house (and to show-off) my ever-growing show pin collection, but here’s the deal… when I made this banner way back in 2014, I never really thought I would “outgrow” it, because we pretty much only did Spring and Fall Quilt Market at the time which meant we only added two new pins a year. That was before we ever anticipated adding 4-5 retail show pins per year!
So long story short… this past Fall we ran out of space on our Banner which meant it was time to make a new one, only BIGGER!
And it occurs to me that since many of you ALSO collect showpins like I do, that you might like to know how we went about constructing our banner, so here goes!

First off, you’ll need to choose your fabrics and cut an ample supply of 1 1/2″ X 1 1/2″ squares. The “square area” alone of my banner is 8 squares by 9 squares (Half white and half purple) and then there’s 25 more squares required in the triangular area at the bottom of the banner.

Now stitch you 1st row of nine squares together (alternating white and purple squares). All of the 1/4″ seams should be pressed open.

The colors in your second row of blocks should be alternate with those in your first row. Once complete with seams pressed open, align 1st and 2nd row RST matching all seams. Stitch 1/4″ from edges, then press this seam open also.

Continue stitching rows together until the “square area” is the size you want.

Once the “square area’ is the desired size (8 blocks tall by 9 blocks wide in our case), the next few rows will be become 2 blocks shorter (one block on each side) until the last block is just a row of one (at the tip of the triangle).

Now both sides of the triangular area need to be trimmed into a straight line. Your ruler should line up as shown (at left).
Once trimmed, place your banner WSD on the fusible side of your fusible fleece). Trim overhanging fleece edges even with banner edges.
Now place banner fleece-side DOWN on WS of banner backing. As was down above, trim overhanging banner backing even with fleece and banner edges. Bastes all edges together to secure them.

Now all that’s left is to bias tape your edges and add 3 tabs at the top for hanging. I like to hang my banner from a 1/2″- 58″ wide wooden dowel.

And here’s the finished banner, fully loaded with our show-pin collection as it stands today, prior to picking up a new Road to California pin this month! I’m happy with how it came out, but I don’t think I’ll be taking it back forth to our shows anymore. It’s amazing how heavy it is now and I’m afraid that it might get damaged in transit. I’ll just hang it in my studio where i can enjoy it everyday!
And now…. it’s YOUR turn!
And remember, we love reading your comments and answering your questions too, so please feel free to leave either or both in the space provided below.
Check out the best sewing pins with me on Pinterest, join in on discussions or show off your work in our FaceBook Group, or get your daily sewing fix on our Facebook Business Page or get behind the scenes scoops on Instagram, and be the 1st to know about new patterns, discount codes and sample sales by signing up for our monthly newsletter.
2 Comments
Join Our Mailing List!
Click button below to get 15% off your 1st pattern!


Fun to see the variety! I probably would have made a second one that matched the first in size instead of a whole new one and transferring the pins.
What variety in pin designs!