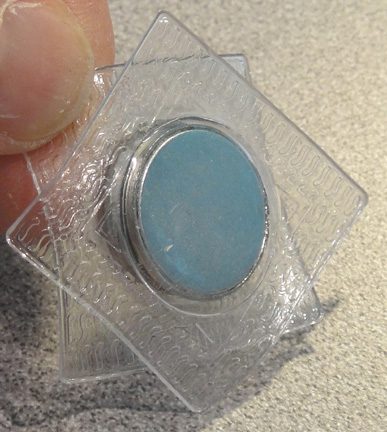
3/4″ invisible sew-in magnetic snaps (1 matched set per pkg)
So…
we’ve been hearing this question more and more of late since
our invisible sew-in magnets are getting more and more popular, and since it’s a bit tough to explain over the phone or in an email, I thought it might be a good idea to write up a little procedure as a blogpost and then place it on the website for our customer’s future reference.
So here goes!
1- Choose which pattern pieces you’ll be using in this procedure– Your pattern instructions MAY for example call for you to fuse or stitch your foundation material exclusively to your lining pieces pieces, BUT in order for your magnet pieces to engage correctly it will be very important for one of them to be affixed to the lining (probably of your Bag Flap, Tab or Pocket) and the other to your Bag Exterior. Please keep in mind that this may be in direct opposition to your instructions so please give this some careful thought prior to starting this process.
*ADDITIONALLY— While your sew-in magnet is only 3/4″ wide, it is encased in plastic that’s over 1 1/4″ wide, so it may in fact be too wide for the fabric item you want to place it on. In most cases you can increase the width of this item without causing problems in functionality, but you may want to experiment a bit with this before committing to this change.
2- Transfer magnet placement directly to your foundation material– There’s several ways to make sure you place your magnet in the correct spot on your foundation material and we’ve probably tried them ALL, but here’s the easiest way by far! The placement spot will most likely be indicated on your pattern piece with a circle and we recommend cutting out the area within this circle and using it as a guide. First, replace the pattern piece on your foundation material, then mark along the inside edges of the cut circle with a Sharpie. Now it’s a simple matter of placing your magnet over the the marked circle and pinning it in place (see below).
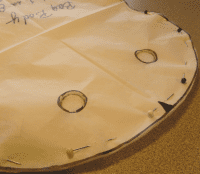
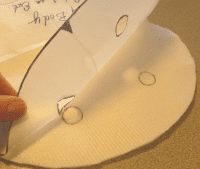
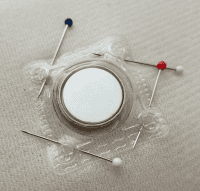
3- Sew your magnets in place onto your foundation material– Whether you’re using interfacing, fusible fleece or Soft & Stable for your foundation material, you’ll need to place and sew your magnets in place directly to it in the following way.
a) if you’re using fusible interfacing or fleece, then you’ll be stitching one side of your magnet to the fusible side of your material with the magnetic-side of your magnet facing UP.
b) If you’re using Soft & Stable (or a similar substitute), you’ll be stitching your magnet directly to the material with the magnetic-side facing UP.
4- Stitch magnet in place around entire plastic perimeter of magnet– Because of the wear and tear this area will be subjected to, do NOT be stingy with your stitching. I generally stitch TWICE around the entire perimeter of the magnet.
5- Stitch or fuse the foundation material to the WRONG side of your fabric–
a) Place fusible interfacing or fleece (with magnet stitched in place)
on WRONG side of Flap,Tab or Pocket lining, sandwiching the magnet piece
in between the two layers and aligning all outside edges. Fuse in
place.
b) Place your Soft & Stable (with magnet stitched in place) on WRONG
side of exterior fabric sandwiching the magnet piece in between the two
layers and aligning all outside edges. Stitch in place close to side
edges of fabric.
6- Verify that the magnets click in place as they should– They may seem silly, but I’ve learned from bitter experience to ALWAYS check to make sure the magnets work properly and that the right pattern pieces are being held in place.
Now you can go back to your bag instructions to complete the construction of your Bag as you would normally!
Additional Resource Materials are available below-
Mag Snap Placement- the easy Schmeasy Way
Sew-in magnetic Snaps- A Quick Videotorial
Sew-in Magnet Stitching Tips
**********************************************************************************************
And now…. it’s YOUR turn!
Have you substituted sew-in magnets for the oldy-goldy clamp-in style magnets yourself? If so, do you have tips of your own to share? Remember, we love reading your comments and answering your questions too, so please feel free to leave your comments about these and any other aspects of this new design in the space provided below.
Check out the best sewing pins with me on Pinterest, join in on discussions or show off your work in our FaceBook Group, or get your daily sewing fix on our Facebook Business Page or get behind the scenes scoops on Instagram, and be the 1st to know about new patterns, discount codes and sample sales by signing up for our monthly newsletter.




I actually prefer the “old-goldy-clamp-in style magnets”. To me, they are more secure. My best advice is to carefully read the instructions (which you always tell us to do – LOL) and you will be able to figure out how/when/where to place the clamp-in magnets. I find my magnets on Etsy and other places. I love that you can get them in different colors, even rainbow! I have made oodles of the Quattro and I find that I like substituting the clamp-in magnets for the zipper closure on top.