Due to our monthly ‘Handbag Contest’, we are constantly receiving handbag pictures from our customers. And you know what? I’m going to share a secret with you. Sometimes the best-looking, most beautiful bags don’t win and more times than not, the reason is a poorly taken photograph.
You’ve probably noticed this yourself. So I’m thinking, maybe it’s time to share a few picture-taking tips, because let’s face it- even though taking pictures of handbags or other craft items is a lot different than taking pictures of people, or pets, or scenery, it really doesn’t HAVE to be hard! So without further ado….
FIVE steps to Better Pictures
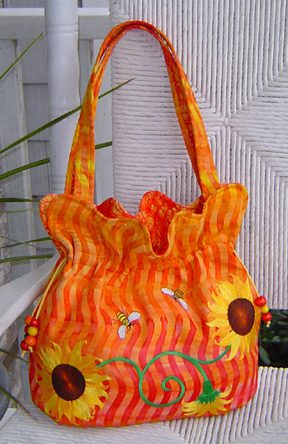
The Boho Baguette was
an especially easy photography subject
1) Presentation- This is the easiest, but possibly the most overlooked element of a good photo. It takes very little time to prepare your handbag properly for the picture. Press it, fluff it up. I generally stuff my bags with bubble wrap or scraps or fabric so they have a full, plumped up look. Arrange the straps in an attractive way, or hang the bag by the straps off a chairback, doorknob, or a hook.
2) Composition- Your bag should basically fill your picture. Zooming in closer will allow the fine details of your bag to become evident. It will also eliminate background distractions. (You can always crop your picture later on, to accomplish this same effect.)
3) Lighting- The easiest way to get good lighting is to go outside. Indoor photography generally requires more than one light source to avoid shadows and less than accurate coloration. If you notice, most all of my official photographs are taken outside. I like to find a nice bright spot with lots of indirect sunlight. I never take photos in full sun, because that can produce similar shadow problems as with indoor photos. Additionally, intense sunlight can wash-out the colors, and make certain fabrics or metal notions ‘shine’ in an unnatural way. My front porch is just about perfect on a sunny day from about 9 in the morning until 2 or 3 in the afternoon.
4) Focus- Always check how your photos look after you offload them to your computer. A photo can easily appear to be in focus on your camera’s screen, but a closer inspection on your computer might reveal that in fact, it isn’t.
5) Background- Take a moment to assess the background for your picture. It matters. A neutral, non-reflective surface is good. Personally, I do not think that dark backgrounds are best for bags, because subtle features or fabrication details get lost. But I do not ascribe to the theory that the background must be one flat color either. I like to photograph my bags in a natural setting with colors that do not add or detract from the bag. For me, I love the neutral textured background of my white wicker porch rocker, and if ever it gets so it can no longer be adequately cleaned up or painted, I’ll have to immediately buy a new one.
So next time you get ready to take a picture of something you’ve made, (or someone you love), why not give these tips a try. I’m pretty sure you’ll find that it only takes a little bit of extra effort to take your photos from OK to GREAT! Or better still, do you have a tip of your own that the rest of us can try?
Did you enjoy this article? Please pass it on to others at Facebook or StumbleUpon, and feel free to share your own thoughts in the comments section below!
Join Our Mailing List!
Click button below to get 15% off your 1st pattern!


