So…
ever since we posted the pictures of our NY Skylines bag sample, we’ve had a LOT of questions about how we go about laying out the pattern pieces for a bag like this.
And the truth is… even though this is a question we’ve heard a LOT over the years, it’s probably one of the more difficult questions to answer that we’ve ever gotten!
WHY?
Well…. the main reason this is a REALLY hard question to answer is most notably because every piece of fabric is different and needs to be evaluated and handled differently! There just isn’t a hard and fast formula for utilizing a large-scale print such as this for a bag.
There are however a few tips I can give you that might make the process a little easier, along with a couple of fussy-cutting realities to keep in mind…. but FIRST!
Let me show you the layout I used
for MY Skylines Bag! (below)
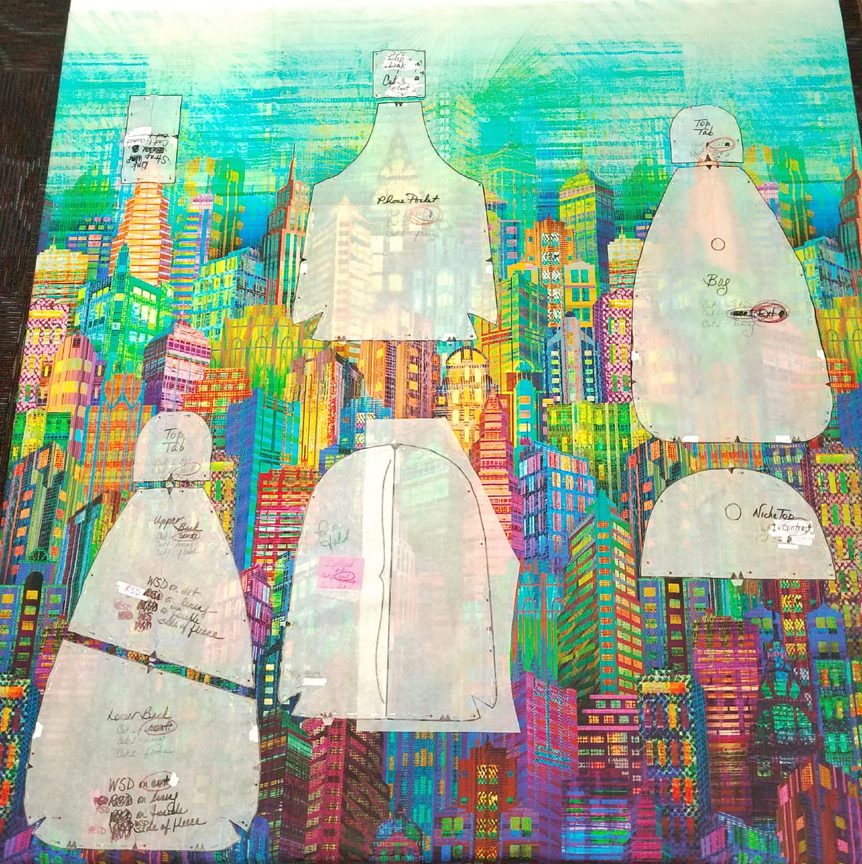
and so… while keeping the photo above in mind,
here’s EIGHT important things to remember
BEFORE starting a fussy-cutting project!
1) There’s a LOT of waste involved in fussy-cutting! Take another look at the photo above to see how much fabric I wasted on this project alone. I did manage to go back and cut some bias tape later on but overall the remnants that are leftover really arent big enough to do a lot with (but of course I wont be throwing them away!)
2) Use tracing paper pattern pieces. Always trace out the pattern pieces you’ll be using onto tracing paper so that you can “see thru” to the fabric elements underneath in order to match your various pieces.
3) Never lay out your pieces “on the fold”. You really need to be able to see the ENTIRE fabric under your pattern piece in order to consistently be able to match the print elements in your fabric. So… always create a mirror-image of any pattern piece that is to be placed on the fold of the fabric (as in the case of the Zipper Pouch piece in the example above). Tape it together with your original pattern piece to create a complete unit and then place and use it as usual.
4) Don’t undertake a fussy-cutting project if your in a hurry, tired, hungry or angry. You could add other descriptors here if need be, such as distracted, uninspired, etc., but the point is, you need to have your wits about you to undertake this project.
5) Limit the number of pieces you actually cut out until all of your pieces are laid out. I try my best to not actually cut out any of the pattern pieces until everything is placed and pinned and I’m satisfied with all of the placements. WHY? Because more than one time I’ve had to remove all of my pieces and start over because I either ran out of fabric before I ran out of pattern pieces OR, even though I had plenty of fabric, I just didn’t have enough fabric in the required matching areas, so I had to choose my layout differently, which I couldn’t have done, if I had started cutting too soon!
6) Remember to consider seam allowances. The area that needs to matched is in the VISIBLE AREA of your finished project, NOT in the seam allowance area.
7) Don’t be afraid to draw style lines directly onto your pattern pieces to aid in references. It’s not unusual for me to literally outline certain areas of the underlying print elements right onto my paper pattern piece as a matching aid.
8) Know up front that not ALL fussy-cutting projects have a happy ending, but the ones that do are immensely satisfying! Even after all the projects I’ve attempted and completed, I STILL make mistakes when fussy-cutting! This method takes a LOT of practice to perfect. My advice? Start out with a project that only has say only one or two areas to match and then proceed from there.
*********************************************************************************************
And now…. it’s YOUR turn!
Can you think of anything I forgot? If you have any comments, advice or experiences in fussy-cutting that you’d like to share, I’d love for you to hear about it! And remember, we love reading your comments and answering your questions too, so please feel free to leave either of both in the space provided below.
*********************************************************************************************
Check out the best sewing pins with me on Pinterest, join in on discussions or show off your work in our FaceBook Group, or get your daily sewing fix on our Facebook Business Page or get behind the scenes scoops on Instagram, and be the 1st to know about new patterns, discount codes and sample sales by signing up for our monthly newsletter.
Join Our Mailing List!
Click button below to get 15% off your 1st pattern!


