So…
A little while back I did a little post featuring some featuring some uniquely embellished sewing machines that I had found while surfing on the web, and I mentioned that I was SO inspired that I thought I might try it myself sometime with my old Singer.
I knew that my best chance to play around with my machine would probably be AFTER I completed work on the PortaPocketsPLUS pattern, but BEFORE I started a new design, so when the opportunity presented itself, I jumped at the chance!
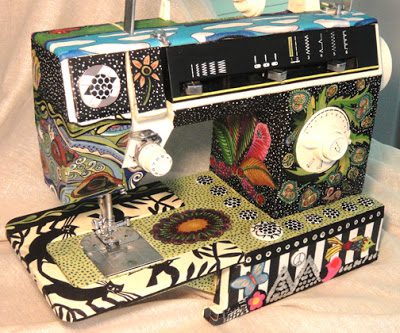
I’ve been documenting my progress on my Facebook page, but I thought I’d use this venue to show a few more pictures and provide you with a bit more info on how I achieved the final look (at right).
Here’s my old Singer in it’s original unadorned condition. It still runs OK, but I haven’t used it in years. But even though its been languishing unloved in the closet upstairs, I didn’t want my “additives” to render this machine inoperable. (I still love it.) For this reason, I’ll need to be very careful about keeping my embellishments away from the moving parts.
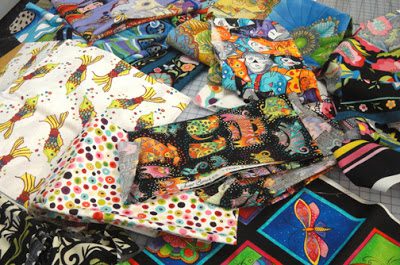
So… with Mod Podge in hand, I started dragging out some of my favorite fabrics from my stash.
In retrospect, I guess I really should’ve made some rough sketches before I began, but you know… I really didn’t have a clue as to what I wanted the final look to be, so I just made myself start, opting instead, to use this project as a way to showcase some of my all-time favorite fabrics.
Here’s a partial list of what I used-
“On the Rio Grande”-Terrie Mangat
“Early Birds”- Jane Sassaman
“Larkspur”- Alexander Henry
“I Dream in Color”- Dianne Springer
“Catkin”- Julie Paschkis
and various fabrics by Laurel Burch and a host of other black and white favorites.
Overall the project was tedious but rewarding. I started by cleaning the surfaces thoroughly with carefully applied windex and the alchohol.
Building the design was very similar to applying applique. I found it worked best to ‘build’ the design from the bottom layer up. Once I had my pieces cut, I applied a thin layer of Mod Podge to the appropriate area of the Singer, and also to the back of the fabric. It was pretty easy to shift the fabric around to get it positioned correctly this way and the air bubbles were easy to remove using this method. There was a learning curve involved, so I quite naturally chose the easiest areas to work on first and saved the toughest for near the end. So here goes!
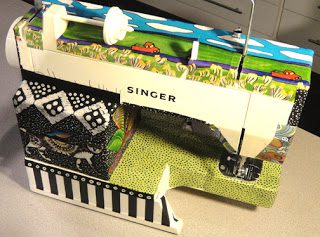
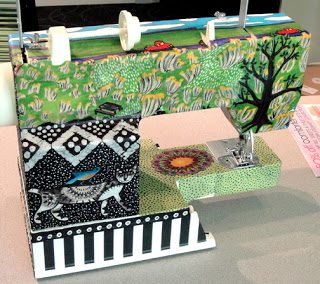
I made the decision to go with a black & white striped base.
Can’t go wrong with that, right? (You know how I LOVE black and white!)
And here’s my Day 2 progress.
I enclosed the main upright with a nice black dot and applied cut out leaves
and other decorations around the stitch selector.
(Dont’ worry!- The stitch selector still works fine.)
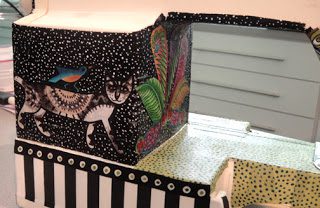
Here’s my Day 3 progress.I decided I did not like the red/blue & purple stripe I had placed on the sewing deck at ALL,so I replaced it an entirely green dotted deck. I like this look WAY better.
On Day 4, I continued decorating the main upright.
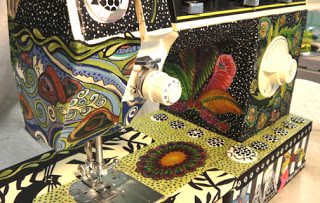
This picture is the first showing progress on the machine back.
By Day 5, I was feeling brave & confident enough in my skills to attempt
covering the machine top (and all of its important orifices) with fabric.This was
definitely the hardest area to cover and I chose to do it in sections. I guess that
was wimping out in a way, but it just seemed so much less intimidating than
attempting to cover the entire top with one piece of fabric.
I did my best to match up the design.
By Day 6, the back of the machine was pretty much enclosed. This was not an easy area
to work on either, but the fabric I chose was easy to segment and build upon, so
the process was easier and less stressful than the top of the machine was.
In comparison, Day 7 was a piece of cake. With the entire machine enclosed in a
base layer of fabric now, the only thing left to do was to finish the decorating.
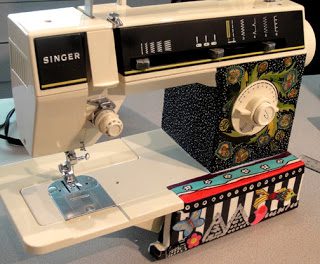
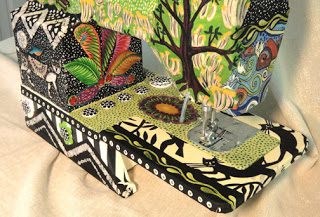
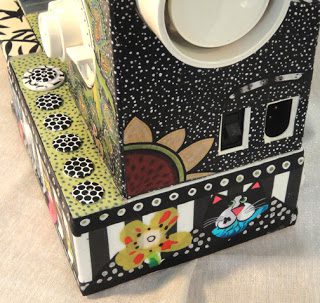
This picture shows the details we chose to add to the back. It also shows you a good shot
at how we ‘dressed up’ the deck extender, which I LOVE! We modified the design
section that surrounded one of the block prints from the
“Catkin” collection and it worked out super.
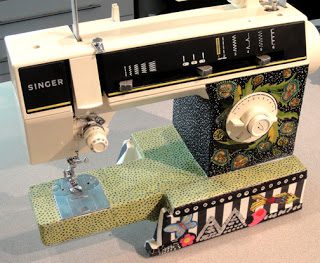
Here’s a sideview closeup. I still may go back and add a few
details here. I just couldn’t find what I wanted to use in my stash,
so for now, I’m stopping. Who knows, it’s still a work in progress, and the
perfect fabric detail may crossmy path in the next few months!
And here’s a closeup view of the machine deck which I embellished
with black & white polka-dotted buttons from my button box. . All in all- I’m thrilled with the finished look. I think my Singer looks happier now and I’m going to give it a place of honor in my Studio where I can enjoy it everyday (which is WAY better than being stuck in a closet upstairs, right?)
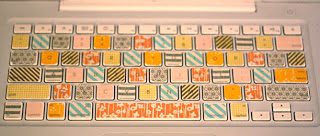
And you know what? This was such a nice diversion and I enjoyed the process so much, that I might just try it on something else in the future, like maybe an old piece of furniture. Besides, it’s a cool way to use up scraps of fabric that I can’t bear to throw away ! And speaking of pimping up the looks of other household items, one of my alert Facebook buds sent me the link to this post detailing how to adorn a keyboard with Washi tape.
Great job Kira! I love it.
So what do you think?
Go ahead, you can be honest! (just be nice) And if any of your projects ever been inspired by a photo you found online, we’d love to hear about them!
Feel free to share your thoughts in the space provided below!
Check out the best sewing pins with me on Pinterest, join in on discussions or show off your work in our FaceBook Group, or get your daily sewing fix on our Facebook Business Page or get behind the scenes scoops on Instagram, and be the 1st to know about new patterns, discount codes and sample sales by signing up for our monthly newsletter.
Join Our Mailing List!
Click button below to get 15% off your 1st pattern!


