So…
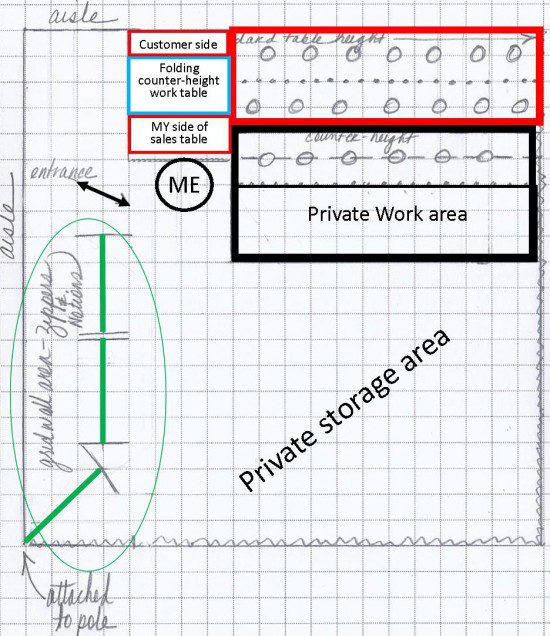
you might recall that for Quilt Market & Festival last Fall, we quit using our revolving notions stands in favor of three 6ft tall grid walls and even though we were VERY pleased that they were easy to set up for us and even easier to use for our customers, I just wasn’t particularly happy with how they made me FEEL… which was hemmed in and a little unaccessible, since one corner of the wall was right on my elbow. Not only was it difficult to help customers find the hardware or zippers they needed, but it was just as hard to talk to them from around a corner. I knew I had to make a change for the Road 2 California show and pictured below is the setup we’ll be trying this time!
As you can see, circled in green on this diagram are our three gridwalls, but we won’t be setting them up in a straight line as we did in Houston. This time we’ll place the first gridwall on a bit of a diagonal, attaching it directly to the side pole itself. This will buy me a few inches of space and hopefully create a better sightline to our products from where I’ll be standing.
The biggest change we’ll be making however is in our table arrangement! We’ll still have 2 tables, one counter height and one desk height, but instead of the sales area being set up on the end of the back (counter height) table, I’m going to locate myself out on the end of the lower (desk height) front table. This will accomplish TWO important things for me;
1- it puts me out in front of the booth, closer to customers with good sightlines to both the bags AND the hardware & zippers.
2- it’ll be really easy for me exit the booth from IN BETWEEN the two sections in order to talk to customers about our designs or assist to them with their zipper & hardware selections.
There is however one BIG drawback to having the sales area out on the lower front table and that would be called BACKPAIN!
I knew if I spent 10 hours each day bending over a sales area that was only desk height for 4 days straight I’d be hurting pretty bad, so I immediately started shopping for a small, lightweight, fold-up table that would elevate my work surface to counter height and this little table (at left) fit the bill perfectly.
The only thing is… this little table will be VERY noticeable out in front of our booth. And even though it’s not a bad looking little thing, it doesn’t exactly “blend” with the rest of our decor. As a matter of fact, I think it would stick out like a sore thumb, and NOT in a good way. That’s why I figured it would be best if I decorated it or covered it in keeping with the rest of our booth, and this is what I came up with (at left).
As you can see, I left the back side partially open so I can use this open area to store non-sensitive stuff that I need quick access to, like a calculator or merchandise bags.
So, what do you think?
Will this booth arrangement work for us? Only time will tell so stay tuned, because we leave for the show TOMORROW and in just a few short day we’ll be in California setting it up for REAL! Speaking of which, if you’re interested in live updates and pictures straight from the show floor in beautiful Ontario, Ca, you might want to join us on Instagram where we’ll be sharing lots of both every day we’re there! 🙂
*****************************************************************************************
And now…. it’s YOUR turn!
I’d love to know what you think of our new booth layout? Remember, we love reading your comments and answering your questions too, so please feel free to leave them in the space provided below.
**********************************************************************************
Check out the best sewing pins with me on Pinterest, join our Facebook discussions, get your daily sewing fix and behind the scenes scoops on Instagram, and be the 1st to know about new patterns, discount codes and sample sales by signing up for our monthly newsletter.
