So…
sometimes folks question us as to why we do not include any layout directions in our pattern package. There have even been a few individuals who have called us (in an agitated state I might add) because they were distressed that they had too many pattern pieces that were designated to be placed on the fold of the fabric for cutting, and based on our stated yardage requirements, there wasn’t enough “fold” for all of these pieces.
And you know what? These are in fact good questions, especially for those who come to us primarily from a clothing background where pattern layout instructions are the norm, and where “staying on the grain” is imperative. So, I’m going to address this question in three parts…
 1) For the most part, “staying on the grain” really doesn’t matter in bag making. Cutting fabric against the grain essentially damages the fabric. It introduces the possibility of stretch to the fabric. Even fabrics that normally have very little “give”, (like 100% cotton) can be stretched, hence the logic behind bias tape. This is especially to be avoided when making clothing (unless otherwise directed to do so) because the weight of fabric that is draped on the bias can cause various components to become misshapen (don’t ask me how I know this!).
But for the most part, drape is really not an issue in bag making. Think about it… most of your pattern pieces are either fused or sewn to foundation materials anyway and the few that aren’t are seldom if ever are given the opportunity to drape freely. With extremely few exceptions they are sewn in place on all sides. Theoretically, you could cut ALL of your bag pieces on the bias and experience no ill effects in your bag. I have in fact done this when I make a chevron front!
2) You might wonder therefore why we bother to include grainlines on some of our pattern pieces then, and the simple answer is that we include grainlines primarily as an aid to those who are using directional prints for their bag exteriors, which is REALLY common. Let’s face it, it can sometimes be difficult, if not impossible to look at a randomly selected pattern piece for handbag and visualize how it will fit into the final look of your bag. If for example you’re using a striped cat print for your bag, how weird would it look if your cats were ears up on one side of your bag, but ears down on the other.
3) There are many ways to create additional fold lines in a cut of fabric. It’s true each of our pattern packs includes quite a few pattern pieces that are designated to be cut on the fold of the fabric. Why? It’s really just simple business math; Pattern pieces that are to be placed on the fold are HALF their ultimate size, and…
Smaller sized pattern pieces = Fewer pattern sheets per pattern package = Lower pattern costs + Lower shipping fees.
But here’s the thing…there’s absolutely no reason you are compelled to utilize the factory fold line ONLY. (Most times the factory fold isn’t even on the grain of the fabric anyway, right?)
We recommend instead, that you create your own fold lines (in addition to the factory fold line). They can certainly still be on the grain of the fabric if you like, or not… and the pictures below demonstrate this.
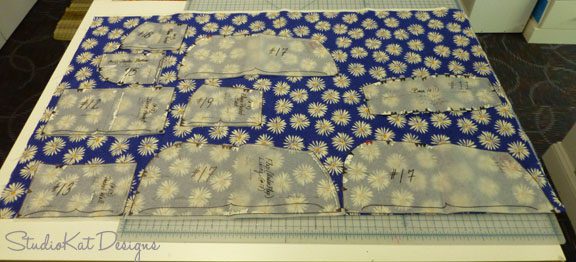
So…in this example (above) I have EIGHT pattern pieces to cut out for the Uptown Saddlebag lining, and guess what? SEVEN of them need to be placed on the fold of the fabric for cutting. I have a yard of fabric as called for in the pattern but as you can see, only THREE of these pieces can be placed on the factory fold. I could do one of two things, a) I could call the designer and complain about the yardage requirement being all wrong, or b) I could start creating my own fold lines!
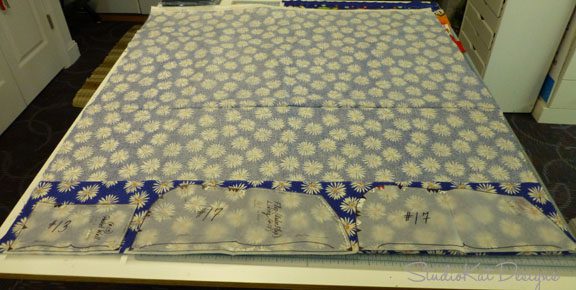
First, unfold the fabric completely, then refold it just enough to place those three pattern pieces from above) along this new fold line for cutting. Three down… five to go.
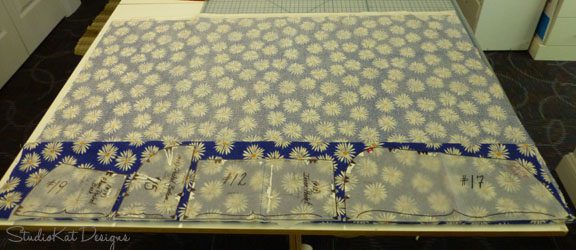
Next, create a new fold line. As you can see, I can place four more pieces along this fold line. Now that’s seven down, and there’s only one piece left that needs to be cut on the fold.
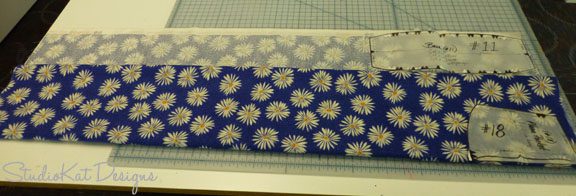
I think you get the idea now, right? So let’s fold it one more time for our one remaining “on-the-fold” pattern piece and as you can see, we’ll even have a little fabric to spare after cutting out that last pattern piece that wasn’t designated for placement on a fold.
So… now it’s YOUR turn!
Was this helpful information?
And do you have any follow-up questions or comments for me?
********************************************************
And don’t forget, we actually LOVE questions and comments too, so if you’d like to share yours, please feel free to do so the section provided below! And if you enjoyed this post, please feel free to share it via FaceBook or Twitter!
2 Comments
Join Our Mailing List!
Click button below to get 15% off your 1st pattern!


I have the SlingLong #4300 the cutting instrections calls for: cut 1 in contrast (WSD on RS of fabric)
What does that mean?
Thank you,
Donna irDonna
Thanks for the question Donna
This means place the pattern piece WSD on the RS of the fabric.
🙂