So… it occurred to me recently, that I’ve never written about some of the really important, behind-the-scenes details that go into the making of a successful and profitable pattern… and here’s the deal… there’s nothing else that impacts the profitability of a pattern more, than the pattern templates. Let me show you how this can be true, using what will soon be our next new pattern as our test case.
Think about it this way… since ALL of our patterns are $13.99, (except for our retired patterns), it stands to reason that the one thing that most directly impacts the cost of each of our patterns is… the number of sheets of paper included (that would be the number of instructions sheets PLUS the number of pattern template sheets). All of which means that the one task that has the greatest impact on the profitability of a pattern is…
Creating the pattern template sheets!
So, let’s talk about that!
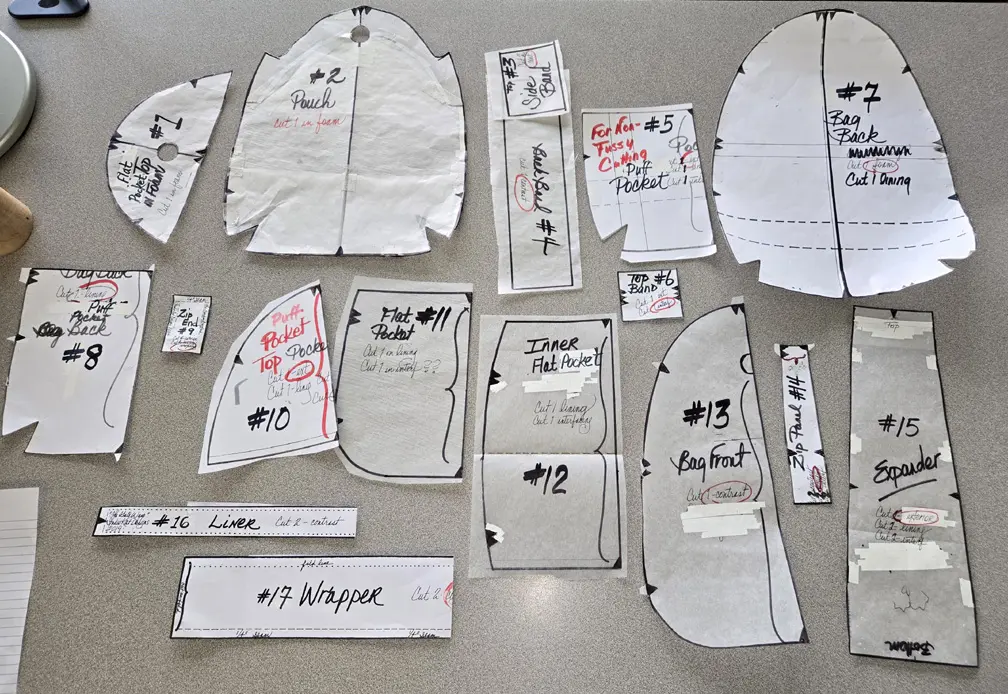
Please take no notice of the condition of these pattern templates as
EVRYTHING at this point in the process is a “work in progress”! 🙂
Our goal for our patterns is to limit ourselves to no more than 8 sheets of paper, (three of double-sided instruction sheets, and 3-5 template sheets). WHY… you might ask? That’s because it’s at this level of printing that we are at our optimum profit margin for a pattern design. For every additional sheet of paper we add to the mix, our profit margin decreases. (Our Side Slinger pattern for example has NINE template sheets, making it the pattern with the lowest profit margin for us.)
For this new pattern, there are 17 pattern pieces and the object of this exercise is to try to squeeze them onto as few sheets of 11″ X 17″ paper as possible.

This task is much like working a jigsaw puzzle & it’s one of my favorite pattern making tasks!
Here’s my third attempt at getting ALL 17 pieces onto 3 sheets of paper… but, as you can see, in this configuration, we couldnt squeeze piece #5 in! So, it’s back to the drawing board!

Here’s my seventh attempt and still I’m looking for a place to park that pesky #5!

And FINALLY! On my 9th attempt, ALL the pieces are in place on 3 11″ X 17″ templates, with a little extra room to place an extra Zipper Panel or maybe 2 extra Zip Ends if we need to!
And just so you know…
There’s is one cardinal rule we stick to no matter what,
when it comes to creating our template sheet layouts, and here it is!
Any pattern template that will be used for cutting in foam,
will NOT be presented on our template sheets
as being placed on the fold of the fabric… because its impossible
to accurately cut a template on the fold in foam!
Which automatically means that template #1, #2, and #7 must be presented in their entirety (ie; NOT on the fold), and templates #2 & #7 are VERY large pattern pieces! But I would NOT like it if these pieces were presented on the fold if I bought this pattern, so therefore, its the right thing to do!

So… back to our pattern sheets, once we’re satisfied with the layout of our templates, it’s time to transfer each grouping of templates to a brand new 11″ X 17″ sheet of paper. At this point I write as LITTLE as possible onto these templates, because here’s the deal… this design is still in progress. There’s much that can still & probably WILL yet change. Therefore, the less ink on this page there is, the less that might need to be erased!
And just so you know… when our pattern testers receive their testing packages, this is pretty much how the pattern templates look! They have notches and cutting lines and that’s pretty much ALL they have!

So there you have it!
It’s good to have all of my templates committed to paper, but its pretty much a sure thing that my final templates will look somewhat different than these do!
Stay tuned for that?
And now…. it’s YOUR turn!
Was this post at all what you expected? I’d love to know what you find the most surprising about this process! And remember, we love reading your comments and answering your questions too, so please feel free to leave either or both in the space provided below.
Check out the best sewing pins with me on Pinterest, join in on discussions or show off your work in our FaceBook Group, or get your daily sewing fix on our Facebook Business Page or the behind the scenes scoops on Instagram! And don’t forget to check out our video tips & tricks on our You Tube Channel and be the 1st to know about new patterns, discount codes and sample sales by signing up for “Bag Making is Fun”, our bi-monthly newsletter.
6 Comments
Join Our Mailing List!
Click button below to get 15% off your 1st pattern!


I always like knowing what goes on behind the scenes, and I like your explanation. However, I am wondering why you don’t make printable PDF patterns? Is that even more difficult to layout? I’ve made clothing and other things where I had to tape the pieces together to get the entire pattern piece. It always come out just fine if I’m careful cutting and taping. I’m being selfish with this comment because I really would just like to get the patterns faster, LOL.
I figured this would come up and there’s actually several food reasons we dont sell our patterns via pdf download. Most of them are summarized in this post below.
https://studiokatdesigns.com/2014/04/ask-kat-about-patterns-by-pdf-download/
It was interesting about keeping the number of pages down.
I like receiving paper patterns and not having to download.
I avoid patterns that I have to print.
I usually pay $22 dollars or more for clothing patterns.
I agree Jo Lacy! 🙂
All of my patterns remain intact. Even clothing patterns. I still have some uncut Vogue designer patterns from the Sixties. Every pattern gets traced onto grid pattern fabric(Pellon) and then cut out. Essentially reverting the pattern back to templates. I find it easier to use without damaging the original, no pin holes and no tearing of the traced pattern pieces.
especially when the pattern templates are on that thin see-thru pattern paper that those old patterns come with, right?
🙂