So…
I tell everyone who will listen that I LOVE using our sew-in invisible magnet snaps because…
- They snap together first-time EVERY-time!
- They’re EASY to sew in place with a regular machine needle.
- And they’re strong enough to keep my bag firmly closed until I WANT to open it!
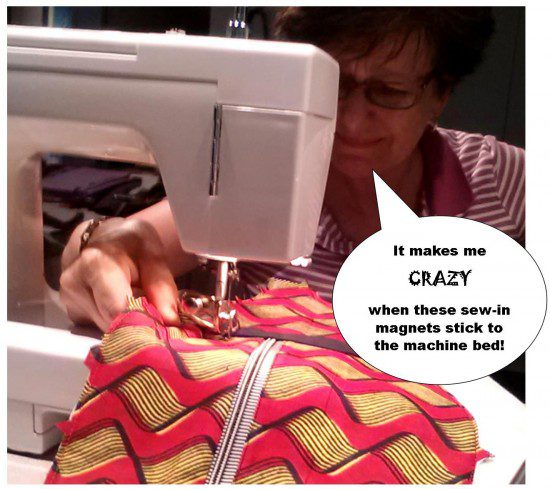
As a matter of fact, it’s the strength of these magnets that causes the only real downside I’ve found to using them, because here’s the deal… once they are sewn into a project, you pretty much have to keep them “face up”, away from the metal sewing bed or they will clamp to the machine so firmly that it’s hard to keep your project moving thru the feed dogs. And this solution works well except for when I want to do a little topstitching, because I for one don’t do my best topstitching from the underside of my project. (how about you?)
I was contemplating this dilemma a few days ago and when it was time to do a little topstitching on a bag I was thinking, “what if I could cover up these magnets just long enough so they wouldn’t interfere with my top-stitching”??? And then it hit me…
EUREKA!!
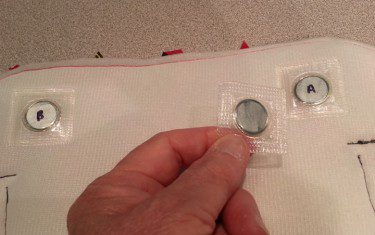
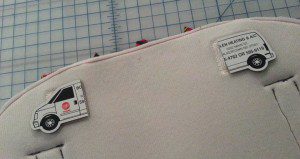
What would happen if I covered the magnetic face of each sewn-in magnet with a spare magnet from my stash? So I pulled out a spare magnet set, separated the pieces (above left) and placed it over the sewn-in magnet allowing it to snap into place. (at left)

Then I placed my bag front “magnet-side-down” on my machine to see if the magnet would still clamp down tightly to my metal machine bed and you know what? The difference was amazing. While the covered magnet was still attracted to the metal bed, the attraction was very manageable and didn’t interfere with the normal movement of the feed dogs! I was ecstatic.
Now I can almost hear some of you saying, “That’s great Kat, but I don’t have spare magnet sets just laying around like you do. Is there anything else I can use to get the same effect?” So I tried several things.
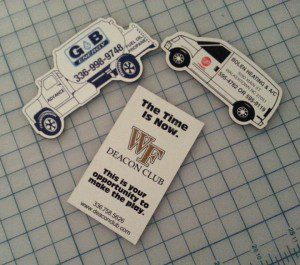
I tried covering the magnet faces with small pieces of metal from the hubster’s shop, but this was ineffective since the magnetic field passed right thru that metal causing it to clamp to the machine bed just as tight as the magnet itself did. What I really needed was something non-metallic with a magnetic field of it’s own and that’s when I remembered my extensive collection of refrigerator magnets (at left).
They cut easily with scissors, so as you can see (at left), I made them just the right size to cover the magnet. And while I found them to be very effective at negating the magnets attraction to the metal machine bed, BUT… I also found that they were not held in place as firmly as the spare magnet was in the example above, and because of this, they sometimes came detached as the fabric was moved and repositioned. I circumvented this problem by waiting as long as possible to place the refrigerator magnet in place.
Later on in the process, I re-tested these “magnet-neutralization” techniques to make sure they would both still be effective even after the magnet “faces” were covered by the lining, and they were!
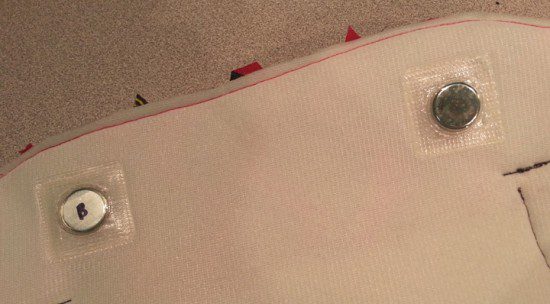
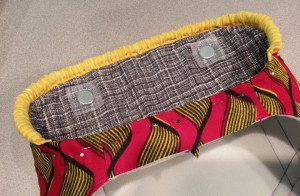
In the picture at right, I’m putting spare magnet pieces to work for me so I can topstitch close to the gathered cording on the top edge of this bag front, as did my cut-down refrigerator magnet pieces also continued to be effective.
So… in conclusion…
The best way to keep sew-in magnets from engaging with the machine bed is STILL to keep them facing UP and away from the metallic machine bed as you stitch. However, some procedures (such as topstitching) are best handled with your magnets facing DOWN and in these cases we recommend engaging (and thus neutralizing) them with either a spare magnet or a refrigerator magnet.
And now…. it’s YOUR turn!
Do you think you might try either of these methods the next time you use one of our sew-in magnets? And most important… can you think of any other item or material that might be a suitable substitute? And remember, we love reading your comments and answering your questions too, so please feel free to leave your remarks in the space provided below.
************************************************************************
Check out the best sewing pins with me on Pinterest, join our Facebook discussions, get your daily sewing fix and behind the scenes scoops on Instagram, and be the 1st to know about new patterns, discount codes and sample sales by signing up for our monthly newsletter.
2 Comments
Join Our Mailing List!
Click button below to get 15% off your 1st pattern!


I truly do appreciate this information on magnets. I was thinking along that because I am altering curtains for our Pre-school, and I had to remove magnets and replace them all the time there are two in the other corners of the same curtain. I had a time just keeping the 16 small curtains apart just to alter them. Half the time I would drag another curtain from where I was sewing and then another and so on til I finally figured that if I face them together then they would not attract another magnet. I am about to sew the magnets back on so was thinking about how to sew them on machine without them sticking to the machine. I will try what I read above and will let you know how it went and any other solution that I might come across. Thank you so much for the help.
Carol DeGasperis (Ohio)
Thank you Kat that tip is amazing. I’ve started putting magnets as my bag clasps and I’ve been having a bit of trouble . I’ve been trying to cover the sole plate with everything from cardboard to rubber and now this is a simple solution. Many thanks once again.